Replaying LLM Sessions for Iterative AI Agent Improvement
 Experimenting with prompts in isolation limits your understanding. To truly grasp how a prompt change impacts an entire session, you need to apply changes directly to real user interactions. Replaying LLM sessions with Helicone unlocks this capability, providing insights unattainable through isolated testing.
Why is this powerful?
- Authentic Context: By leveraging actual production data, you see how changes affect real user experiences.
- Unveiling Hidden Effects: Discover unintended consequences that only emerge over full sessions.
- Accelerated Iteration: Automate testing with real inputs, streamlining your optimization process.
Helicone empowers you to replay any complex session—a capability no other platform offers. Due to our adaptability, more mature product teams often build bespoke solutions atop Helicone to store, aggregate, and analyze their AI workflows, enhancing performance with genuine user data without reinventing the wheel.
In this guide, we’ll demonstrate how to leverage Helicone to replay LLM sessions. You’ll learn how to set up an initial session, query session data, and replay sessions with modifications. We’ll also share tips on customizing this approach for your unique needs.
Overview of the Replay Process With Helicone
The process of replaying LLM sessions with Helicone involves three main steps:
- Setting Up the Initial Session: Instrument your LLM calls to include Helicone session metadata so that they can be tracked and logged.
- Querying Helicone for Session Data: Use Helicone’s API to retrieve the logs of past sessions that you want to replay.
- Replaying the Session with Modifications: Programmatically modify the retrieved session data as needed and send requests to the LLM to observe the effects.
Let’s explore each of these steps in detail by following an example.
Example: AI Debate Application
We’ll walk through an example of a debate session between a user and an assistant. Between each argument, a impartial assistant scores the argument from 1 to 10.
Step 1: Setting Up the Initial Session
Before you can replay sessions, you need to log them properly in Helicone. By adding only 3 headers to your LLM API requests, you can tag and group them into sessions.
Instrumenting Your LLM Calls
-
Configure the OpenAI API client with Helicone
Set up the session headers, configure the OpenAI API client with Helicone, and include the necessary headers when making a request.
const { OpenAI } = require("openai"); const { randomUUID } = require("crypto"); // Generate unique session identifiers const sessionId = randomUUID(); const sessionName = "AI Debate"; const sessionPath = "/debate/climate-change"; // Initialize OpenAI client with Helicone baseURL and auth header const openai = new OpenAI({ apiKey: process.env.OPENAI_API_KEY, baseURL: "https://oai.helicone.ai/v1", defaultHeaders: { "Helicone-Auth": `Bearer ${process.env.HELICONE_API_KEY}`, }, }); // Include Helicone session headers when making requests const response = await openai.chat.completions( { model: "gpt-4o-mini", messages: conversation, }, { headers: { "Helicone-Session-Id": sessionId, "Helicone-Session-Name": sessionName, "Helicone-Session-Path": sessionPath, }, } ); -
Initialize the conversation with the assistant
const topic = "The impact of climate change on global economies"; const conversation = [ { role: "system", content: "You're a debating professional. You're engaging in a structured debate with the user. Each of you will present arguments for or against the topic. Keep responses concise and to the point.", }, { role: "assistant", content: `Welcome to our debate! Today's topic is: "${topic}". I will argue in favor, and you will argue against. Please present your opening argument.`, }, ]; -
Loop through the debate turns
let turn = 1;

while (turn <= MAX_TURNS) {
  // Get user's argument
  const userArgument = await promptUser("Your argument: ");
  conversation.push({ role: "user", content: userArgument });

  // Score the user's argument
  await evaluateArgument(
    userArgument,
    "Your Argument",
    sessionId,
    sessionName,
    sessionPath
  );

  // Assistant responds with a counter-argument
  const assistantResponse = await generateAssistantResponse(
    conversation,
    sessionId,
    sessionName,
    sessionPath
  );
  conversation.push(assistantResponse);

  // Score the assistant's argument
  await evaluateArgument(
    assistantResponse.content,
    "Assistant's Argument",
    sessionId,
    sessionName,
    sessionPath
  );

  turn++;
}
Note: The functions
promptUser,evaluateArgument, andgenerateAssistantResponsehandle user input, argument evaluation, and generating assistant responses, respectively.
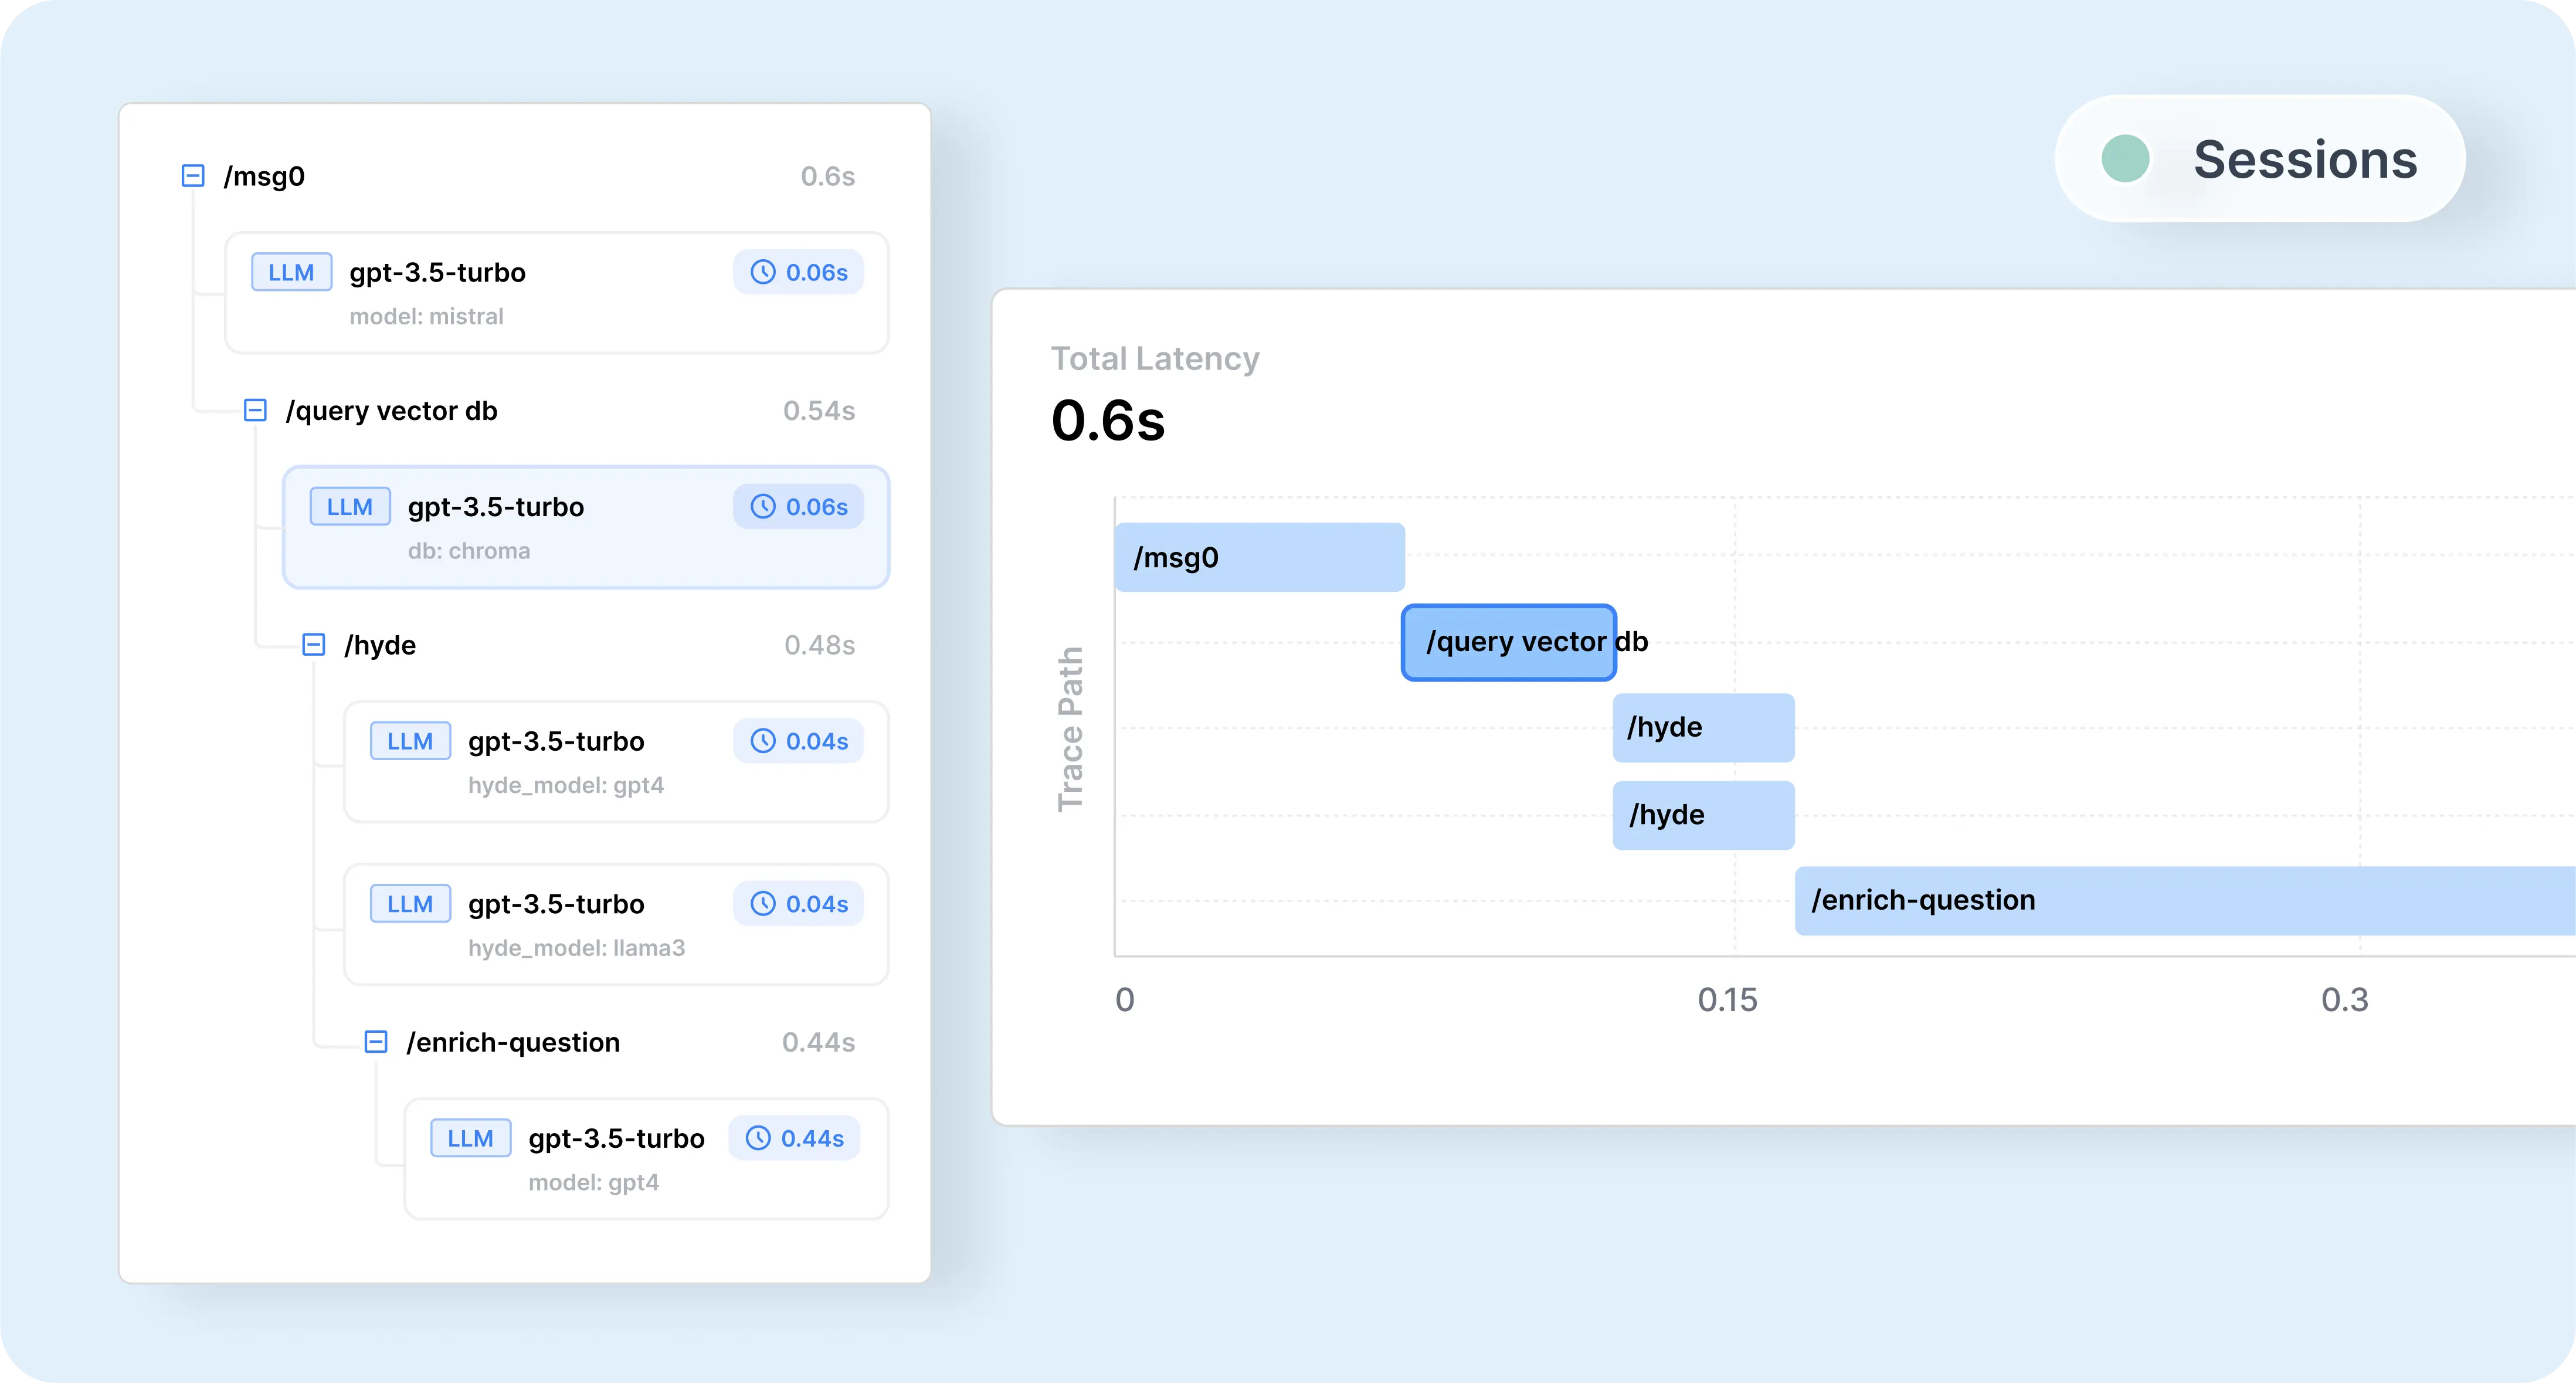
After setting up and running your session through Helicone, you can view it in Helicone:
Go fullscreen for the best experience.
Read more about how to implement Helicone sessions here.
Step 2: Querying the Session Data from Helicone
const response = await fetch("https://api.helicone.ai/v1/request/query", {
  method: "POST",
  headers: {
    "Content-Type": "application/json",
    Authorization: `Bearer ${HELICONE_API_KEY}`,
  },
  body: JSON.stringify({
    filter: {
      properties: {
        "Helicone-Session-Id": {
          equals: SESSION_ID_TO_REPLAY,
        },
      },
    },
  }),
});
const data = await response.json();
Read more about Helicone’s API here.
Step 3: Processing and Modifying the Session Data
Now that you have the session data, you’ll need to process it.
-
Parse and sort the requests
Sorting session data can be complex because each use case is unique and may require custom logic. For our debate session example, we simply sort the requests by their
created_attimestamp.const requests = data.data.map((request) => ({ created_at: request.request_created_at, session: request.request_properties["Helicone-Session-Id"], signed_body_url: request.signed_body_url, request_path: request.request_path, path: request.request_properties["Helicone-Session-Path"], prompt_id: request.request_properties["Helicone-Prompt-Id"], body: request.body, })); requests.sort((a, b) => new Date(a.created_at) - new Date(b.created_at)); -
Modify the request bodies as needed
For example, we can adjust the system prompts to change the assistants argument or argument evaluation response.
function modifyRequestBody(request) { if (request.prompt_id === "argument-evaluation") { const systemMessage = request.body.messages.find( (msg) => msg.role === "system" ); if (systemMessage) { systemMessage.content += " Keep the feedback short and concise."; } } else if (request.prompt_id === "assistant-argument") { const systemMessage = request.body.messages.find( (msg) => msg.role === "system" ); if (systemMessage) { systemMessage.content += " Take the persona of a genius in this field when responding."; } } return request; } -
Replay the modified session
// Create a new session for the replay
const replaySessionId = randomUUID();
for (const request of requests) {
  const modifiedRequest = modifyRequestBody(request);

  // Reuse session metadata from the original request
  await handleChatCompletion(modifiedRequest);
}

async function handleChatCompletion(modifiedRequest) {
  const { body, path, prompt_id, request_path } = modifiedRequest;

  // Send the modified request to the LLM
  const response = await fetch(request_path, {
    method: "POST",
    headers: {
      Authorization: `Bearer ${OPENAI_API_KEY}`,
      "Helicone-Auth": `Bearer ${HELICONE_API_KEY}`,
      // Reuse the session metadata for logging
      "Helicone-Session-Id": replaySessionId,
      "Helicone-Session-Name": sessionName,
      "Helicone-Session-Path": path,
      "Helicone-Prompt-Id": prompt_id,
    },
    body: JSON.stringify(body),
  });
}
Note: In the
handleChatCompletionfunction, we send the modified request to the LLM. By reusing the samesession-name,session-path,prompt-id, andrequest pathfrom the original requests, we ensure that the replayed session is logged in Helicone under the same session metadata. This allows you to see the replayed requests in Helicone, grouped under the same session, making it easier to compare and analyze the effects of your modifications.
After running the replay, you can view it in Helicone:
Go fullscreen for the best experience.
With the replayed session now visible in Helicone, you can observe how the modifications impact the AI’s responses throughout the session. This visualization shows how changes in prompts or configurations affect subsequent interactions.
Optional: Evaluations & Prompt Versioning
Evaluations
To assess the impact of your changes quantitatively, use Helicone’s evaluation features to assign scores to both the original and replayed sessions. Comparing these scores helps you understand the effects of your modifications and refine your prompts more effectively.
Prompt Versioning
Helicone’s prompt versioning feature allows you to manage and compare different versions of your prompts effectively. By maintaining multiple versions, you can test various combinations within your sessions to identify which prompts yield the best results. To retrieve specific prompt versions, use Helicone’s Prompt API.
Here’s how you can iterate over prompt versions to test different compositions in your sessions:
Define a list of prompt versions for each prompt.
For each combination in the cartesian product of prompt versions:
    Generate a new session ID.
    For each prompt in the combination:
        Fetch the prompt content using Helicone's Prompt API.
    Run the session using the retrieved prompts.
Alternatively, as described above, you can manually modify the prompts after retrieving the session, and Helicone will automatically log the new prompt versions for you. In this approach, you create the prompt versions first.
Conclusion
By replaying and modifying LLM sessions with Helicone, you gain deeper insights into how changes affect the entire workflow. This method provides context-rich, real-world data that leads to more effective optimizations and a comprehensive understanding of your AI’s behavior.
Helicone Plug 🧊
Helicone is the ultimate open-source LLM observability platform built for developers to monitor, debug and improve their LLM applications. We’re fully open source and built to handle high usage use-cases seamlessly. With over 1.8 billion requests and 1.6 trillion tokens logged, it’s proven at scale. Check out our open-source GitHub repository here.
Trusted by Industry Leaders: Companies like Sunrun, Michelin, QAWolf, Slate Magazine, and many more rely on Helicone to enhance their AI models and workflows.
You can view the full code used in this guide on GitHub.